Tuesday, June 21, 2011

Canning Tomatoes...Success At Last!


Third time's the charm!  I did not can a puree, but small chunks of tomatoes in a tomato juice, which I boiled before pouring it into the jars.  All canning rules were followed and tomatoes came out looking great.  Especially pretty is the two basil leaves Sugar Snap placed in the bottom of each jar.  I used 25 tomatoes and got three quarts and two pints.  So, just to recap, for canning success follow these rules:
*Skin the tomatoes by dunking them for a minute in boiling water and then submerging in ice water.  Skins slide right off.
*Boil the lids (you must use new ones) and rims for 10 minutes.
*Boil the clean jars for 10 minutes
*After filling the jars with chunks of tomatoes and water or tomato juice, run a spoon or butter knife around the inside edge of the jar to remove any air bubbles.
*Submerge jars into boiling water - make sure they are fully submerged - for 45 minutes.
*Remove and let sit.  If the center of the lids pop then they did not properly seal.  I have never had this happen, but do check for it.
Happy Canning!
Sugar Snap and Sweet Potato skinning tomatoes.
They didn't love it.

Canning Tomatoes....FAIL AGAIN

Second try, still getting lots of tomatoes.  I followed all the rules.this time.  I even invested in a $6 canning kit that includes a proper jar holder (no boiling water down my arm this time), a magnetic stick to pull out the lids, a funnel, and a little tool to get rid of the air bubbles after the jars are filled.  I boiled the clean jars, boiled the lids and rims for 10 minutes.  I dunked the tomatoes in boiling water and skinned them. Then I put them in the blender because the plan was to can tomato puree.  Sweet Potato will eat tomato sauce, but she, like a lot of 11-year-olds, is finicky.  It has to be smooth,  not chunky.  No tomato chunks or onion chunks.  So, I usually start with tomato puree when I make my tomato sauce for pasta, pizza, etc.  I poured the tomato puree in to the cleaned sterilized jars, placed the lids and rims on them and submerged them into a pot of boiling water for 45 minutes.  I pulled them out with my new jar holder, and they looked good.  I let them sit for 24 hours, came back and now I'm not so sure.  The tomatoes have a lot of liquid and the liquid separated out.  I don't know.  I could be wrong, but they look like cans of botulism to me.  They aren't pretty at all, and although they may not be poisonous, they aren't something I would ever take as a hostess gift.  Will try again.
A Can of Botulism?

Tuesday, June 14, 2011

Lazy Composting

I have mentioned in previous posts that I am a chronic half-asser.  If there is an easier (lazier) way to do it, I will find it.  Case in point:  my composting method.  I do have a composting bin, but it is about 100 steps away from my kitchen.  Whoa.  That's far.  I religiously dumped (or rather had Sweet Potato dump) the compost in the bin for about 6 months until she and I both ran out of steam.  I never got around to using said compost.  It needed to be turned - that never happened.  It would need to be shoveled into a wheelbarrow and moved - that was never going to happen.  In the meantime the compost container on my kitchen counter was filling up.  What to do?  I discovered Lazy Composting.  Once I have filled the bin with potato peels, orange rinds, coffee grinds, banana peels, and eggshells - anything the chickens won't eat (but make sure you don't compost any meat product.  I don't even compost beans cooked in chicken stock, it will breed maggots in your garden).  I take the container and a hoe and dig a quick hole between the pepper plants or okra or wherever and completely bury the compost directly into the garden.  Mind you, I still use an organic fertilizer about once a quarter, but so far this method has worked very well for me for several years now.  It creates great dirt in my garden that worms love, it keep garbage out of the landfill, and best of all we have had some surprises come up.  Apparently I buried some watermelon rind in the eggplant bed that still had a few seeds in it.  Lo and behold, up came a volunteer watermelon!  Every day is Christmas in the garden!
The Volunteer Watermelon

Monday, June 13, 2011

Gulf Coast Gardening 101


You have to do raised beds.  I can't tell you how many people I have met who have tried to start gardens by using the existing dirt.  They dig it up and turn it and try to amend it with humus, peat, cat litter, you name it.  While I'm sure someone somewhere has managed to grow something in this gumbo clay, I don't know why anyone would want to go to so much trouble!  Raised beds are so much easier.  Figure out how much space you need for your garden and scrounge up enough cinder blocks to create your bed.  I have nine 4ftx8ft beds. plus one 10 ft. round bed for my melon patch.   Do not use treated lumber for this.  Treated lumber leaches arsenic and you would have to line it with plastic (I know this because I made this mistake).  Make sure the grass where your bed will be is mowed.  Completely cover with 8 sheets of newspaper (not the glossy colored kind).  Fill your cinder block bed with about 6 inches of great dirt - I originally bought a truck load that was delivered to my house for about $150 and was plenty to make all of my beds and then some.  Use a potting soil and compost mix or a good humus.  I would stay away from mushroom compost.  It loses its minerals very quickly.  Plant seeds or plants.  Don't overcrowd your plants - this is the biggest mistake most new gardeners make.  Give them plenty of space and support.  If it's a vine like cucumber or gourds, make sure to supply it with something to climb on.  The key to great tomatoes is support.  Provide them with a good tall solid cage and they will reward you with fantastic yield.  I suggest neem oil to deal with most pests - it's organic.  As for watering use a drip system or place your hose on the ground near each plant and let it run.  It's best to water early in the morning or in the evening when the air is cooler.  If you spray water your plants at 2 o'clock in the afternoon you will effectively boil them.  I have 8x4 ft. beds and I let the hose run for 20 minutes in each bed every other day.   Once your plants are in the ground and watered, please mulch them.  This keeps down the weeds and helps hold the moisture in, and, in my case, keeps the neighborhood cats from thinking my garden beds are litter boxes.  I use old hay for mulch.  It works great and is super cheap - one bale will cover a lot of garden and costs less than $10 at any feed & supply.  Keep in mind that our better season for planting and growing is October through the winter.  That is when we can grow tomatoes, lettuces, greens, beets, radishes, pumpkins, onions, broccoli, cauliflower and more.  Save yourself a lot of headaches by learning what we can grow when.  We are on a different schedule from the rest of the country.  We should be harvesting our summer tomatoes about the time Michigan is planting theirs.  Most of our summer veggies - okra, squash, tomatoes, etc. should be in the ground the first week of March.  For reading, I would like to suggest the Houston area organic gardening bible: Year Round Vegetables, Fruit and Flowers for Metro Houston by Bob Randall, Ph.D.  It is packed with great information, but honestly I read everything ever written about Gulf Coast gardening and didn't start to get good at it until I volunteered in a community garden with a Master Gardener.  The learning curve on organic gardening is steep, but if you are like me every season brings just enough success to keep you coming back for more.  Remember that there is help out there.  Urban Harvest is a great resource for information and things going on including plant and tree sales.  Visit them at www.urbanharvest.org   Donna Faye at Sweet Organic Solutions on I35 in Pearland is very friendly and very helpful.  So is Buchanan's on 11th in the Heights.  I prefer to buy my plants from these and other local sources because they sell varieties that do well in our climate.  The big box stores will sell you what they sell at every other shop in the country, and I don't care who you are table grapes and raspberries are not going to grow for you if you live south of I10.  Good luck and good growing!
Sweet Potato and a friend harvesting eggplant.

Canning Tomatoes...FAIL

Well not really a fail, but I will admit to not completely committing to this project 100% .  I did wind up with 10 pints of tomato puree in the freezer, but I didn't have all of the right equipment which resulted in a huge mess (ruined a white t-shirt.  Note to self:  don't can tomatoes wearing white).   I also wound up pouring boiling water down my arm because I was using tongs instead of a proper jar lifter.  I have never attempted canning before mainly because I am a chronic half-asser and canning is something that must be done right or your family will come down with a nasty case of botulism and it will be all your fault.  Actually, Sugar Snap keeps a healthy distance between herself and any tomato or tomato product so she would be fine, but the rest of us would be hospitalized.  I had 15 good sized tomatoes red and ready so I followed the instructions more or less.  I did boil the jars and lids first but I didn't use new lids like you are supposed to, I reused everything.    Next time I will invest in some quart size jars.  Here's what you do:
Bring three stockpots full of water to a boil.  Also have a large bowl of ice water at the ready.  In the first pot submerge your tomatoes for a few minutes, extract and put into the ice water.  This will allow the skins to slide right off.  At this point you can cut tomatoes in chunks or do what I did, put them in the blender to make crushed tomatoes.  Put just a half of a teaspoon of lemon juice in with the tomatoes so they keep their color.  In the next pot boil the lids and rims for the jars.  You can reuse rims, but you must use new lids unless you want to freeze the tomatoes until they are ready to use.  Boil those for 10 minutes.  In another pot boil the jars.  I did all of that, poured the tomato puree into the jars and then set them in the deep freezer.  I plan to try this again the right way - using new lids and boiling the jars after they are full - and I will wear an apron.  I'll let you know how that goes.

Sunday, June 12, 2011

My Perfect Muffin (lol!) w/ recipe

I am a tightwad.  Bigtime.  I make every meal from scratch because it allows  more nutrition for less money.  I have also found that using a boxed muffin mix takes the same amount of time as making them from scratch.  This recipe is very versatile - use what you have in your pantry to create fantastic healthy muffins your whole family will love.  Preheat oven to 400 degrees.  In a bowl put two cups of flour.  This can be white or whole wheat or a mixture of both.  Add 1 Tbsp baking powder, 1/2 c. sugar  and 1/4 tsp. salt and mix together.  To this add 2 eggs, 1/4 c. vegetable oil and 1 c. milk or other liquid.  Now, here's where it gets fun!  You can substitute the 1 c. of liquid for a wet addition (such as juice or canned pumpkin puree) and also add 1 c. of dry addition (nuts/chocolate chips/ dried fruit/ or a combination of them) plus some flavoring (cinnamon, herbs, vanilla).  Here are some of our favorites:

Lemon balm muffins - add a handful of finely chopped lemon balm and a tsp or more of lemon flavoring (I make my own using grated lemon peel soaked in vodka for several weeks).

Banana chocolate chip muffins - Use a mashed up mushy banana, add 1 c. chocolate chips, and a tsp. of vanilla.

Chocolate zucchini muffins - Instead of 1 c. of milk use 1 c. grated zucchini, and 1/2 c. milk and 1/4 c. cocoa powder and a tsp. of vanilla (you can add some chocolate chips if you really want to spoil the kids).

Best Blueberry muffins - I make these for company or as a hostess gift - Use 1 c. fresh washed blueberries, 1 tsp. lemon flavoring.  Top with a streusel topping before baking - mix together 2 Tbsp flour, 2 Tbsp melted butter and 1/4 c. brown sugar and a good few shakes of cinnamon.

Orange Almond muffins - use orange juice instead of milk, melted cooled butter instead of oil,  brown sugar instead of white and the grated chopped rind of one orange (use only the orange zest, not the pith or it will be bitter) add 1. c. toasted chopped almonds.

You get the idea, the possibilities are endless and delicious.  Spray some vegetable spray into 12 muffin tins or use the fancy muffin papers and fill the muffin cups almost to the top.  Bake at 400 for 10 minutes, then reduce the heat to 375 and bake for an additional 8 minutes.  Makes 12.  Yum!
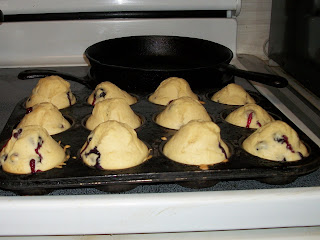
Hot muffins 

Thursday, June 9, 2011

Decoupage - A Fancy French Word for Glueing Pictures

I will decoupage damn near anything.  Several years ago we were given a family dining room set.  Lovely except for the fact that it was perpetually sticky from a previous owner's overzealous use of linseed oil.  Rather than stripping, sanding and resealing the thing (WAY a lot of work).  I decoupaged it.  "Food" was the theme and I used pages from old cookbooks and vintage food ads.  One of my favorite sources for old advertising - which I love and use often - is Reminisce magazine.  It's a fun magazine written by readers who send in memories from the 1920's through the 1960's.  There are lots of old photos and there is a whole page in every issue that is just old ads.  I have used pages of my favorite seed catalog, Shumways, to decoupage the entire inside of my kitchen pantry.  Almost any smooth surface can be decoupaged.  I have done walls, tea trays, TV trays, step stools, the outside of our refrigerator/entertainment center (see previous post).  It is done so easily and cheaply, mainly with things you already have.  So here's how to do it:  clip pictures from a book or magazine.  The paper should be thin and not say, cardstock.  Have at the ready a big bowl of water, a paintbrush, and a bottle of good old Elmer's glue (pour into a bowl).  Clean the surface to be decoupaged with a clean wet cloth and dry.  Have a good idea of where you want the pictures placed.  You may want to lay them out so you know exactly where you want them.  One at a time, soak the pictures in the water until they relax.  This may be hard to do because it's scary.  You think it might ruin the pictures you have so carefully selected and clipped.  It won't mess them up.  Trust me.  The first few times I tried this I didn't soak them or didn't soak them adequately, and my project didn't turn out.  Soak the pictures for a minute or so to really get them relaxed.  Then, gently pull them from the water, and place them on the surface.  Smooth it down with your wet fingers so you don't have any bubbles underneath.  Go over it with a coat of glue with your paintbrush.  Continue until all pictures are placed and glued.  Let it dry for a day or two.  To really seal your work, go over it with a coat of clear gloss polyurethane (available at any hardware store) and a foam brush (foam brushes are cheap and won't leave brush bristles behind).  If you are coating something that will be used daily, like my dining table, go over it several times in several days with the polyurethane, and don't be too disappointed if you eventually get some rips or bubbles.  You can always touch up later.  Have fun and share your pics!
The finished table

Monday, June 6, 2011

An Introduction to RePurposing (or....White Trash Decorating)

My absolute favorite thing to do in decorating is re-purposing things - using old things out of their original context to create a new and unexpected effect.  I have old suitcases stacked up for a coffee table, I use vintage aprons as curtains in the dining room, we had a friend of ours who is a welder make our kitchen cabinet handles out of spoons, and I have everything from old beer bottles to a bowling ball as garden art.  The best comments I get about my home are for the things I have re-purposed.  Case in point:  our entertainment center.  It is made from an old (1940's or 50's) Coldspot refrigerator.  I purchased it here locally, drained it of the liquid and took the coils off the back.  My brother in law brought a saw over to cut out the back so our TV would fit into it. It took considerable effort to get it home (it's HEAVY) and ready.   Also, it seemed a shame to kill a working fridge, but it has been worth it.  DVDs and videos are kept inside the "crisper" drawers, and jars of little collectibles (sea shells, rocks, buttons) are in the shelves.  I love to tell about the time we hired a plumber to come work on the toilet.  He was your typical good ol' boy.  He came in, did the work, then came out into the living area to write up his receipt before he saw the entertainment center.  "You put a TV in a refrigerator," he said, with no emotion whatsoever.  "Yes sir, we did," I said.  He sat silent for a moment, looking at the television.  Finally he said, again without emotion:  "I'm gonna tell my wife about that."  I'll never know if he liked it or didn't, but it got a response! I love to see how I can reuse things in a whimsical way, so old items become new again.  It saves money, recycles, and allows me to use my creativity all at the same time.  What have you re-purposed?
Our Coldspot entertainment center.

Wednesday, June 1, 2011

The Art of Hanging Laundry


A year ago in September Hubby was working in Dallas and coming home on the weekends.  During that time, my dryer pooped out.   "Screw it!" I thought, "I don't need no stinking dryer."  I had been meaning to start hanging my laundry, and decided to take the opportunity to give it a try.  To this day I still have not replaced the dryer.   (How WT is that, to have broken major appliances sitting around?)  I have had to make some adjustments, but it has not been at all difficult - and we generate a lot of laundry. My six-year-old Sugar Snap has two to three wardrobe changes a day (look out Cher!), and Hubby changes out of his bidness clothes into more comfy almost every day.  We also do not use paper towels or paper napkins, we use cloth, so those have to be laundered.  Whereas I used to do several gigantic loads of laundry each week on one day (I very cleverly called it Laundry Day), now I do laundry every day that it isn't raining.  When I wake up I sort one load and put it in the washing machine and try to get it hung up by 10am to ensure that it gets dry.  My understanding is that in some parts of the world it is possible to get two consecutive loads dry in a day, but down here on the Gulf Coast where the humidity is 90+% that would be a challenge.  Sweet Potato (my 11 year old) brings the laundry inside at the end of the afternoon at around 5pm.  The only drawback I have experienced is that I like fluffy towels and line-dried towels come out crispy crunchy.  When we took a little mini vacation at a rent house in Galveston last year Sweet Potato crawled under the staircase and refused to leave.  It took some time to figure out why she was so hesitant, and she finally confessed "I don't want to leave the fluffy towels!"  No amount of fabric softener will help, so it might be worth having a dryer just for the sake of a luxurious bath.  Hanging the laundry has become  one of the chores I most enjoy.  The freshness of the clean laundry is unrivaled by any of the perfumey fabric softeners.  I always take a step back after I am done hanging and take a good look because I love the way the clothes look hanging on the line.  It's a little bit different every time.  It's art.
Sugar Snap playing in the laundry line.